Wednesday, 26 June 2013

Customised: Next blue and white striped tie front top

A quick update on my pyjama trousers - they've been a massive success so far. Not only have they not fallen apart, but they've been so comfortable that I've not just been wearing them in bed but basically getting them on as soon as possible when I get home in the evenings.  I may need to make another pair so I can get these ones washed at some stage!

On another note - my sister Esther bought this top from Next a few weeks ago.  She really liked it apart from one flaw - the ties at the front.  Typically when there's something that fundamental that you don't like about a garment, you don't tend to buy it, but Esther has a lot of confidence in her big sister's new found sewing skills, so when she was last over she brought it with her to see if there was anything I could do with it.  This is the first time I've done any customisation of shop bought items - always nice to experiment when it's someone else's purchase at stake...!


Before
After


 and...


So here we go - how do you chop off part of the garment and still make it look as if that was what it was meant to look like all along!?

  • Step 1 - Do some planning.
As well as ensuring that I had matching thread (helpfully provided along with the top by Esther), the most important thing was to ensure that I knew where I was going to start cutting, so that there were no major errors which would push the whole garment out of shape.  I followed the line of the existing hem, and used tailor's chalk to draw on the top where I was going to cut.


  • Step 2 - Prepare the new hem
The existing hem of the top had been done with an interlocker - something that I obviously don't possess (yet!).  I decided that the best thing was simply to just fold up the existing hem, and make a new hem for the top.  That obviously made the top a bit shorter, but fortunately it was quite long in the first place.  I folded up the existing hem, pressed it, and then folded again, to ensure the edge was fully concealed and there wouldn't be any fraying once the hem had been sewn up.  I then pinned - always an important thing to do - otherwise things could go very wrong...


  • Step 3 - Sew and press
Literally it is as simple as that!  I used quite a long straight stitch, and just hemmed the top again.  A final little press of the hem, and there you go.  You'd never know it had ever been tampered with!

As yet, Esther hasn't actually seen the finished result, but hopefully she'll be pleased with it.  As far as my first customisation went, I was not just relieved (someone else's money hadn't been completely wasted!), but actually really pleased with it.  I'm hoping I'll have more confidence in the future to have a go at changing things when a garment isn't quite what I want.

Sunday, 23 June 2013

Striped pyjama trousers

Buying the perfect fabric for my pyjama trousers - and the fact that I'm now off to London for 3 weeks and therefore without my sewing machine *weep* meant I was really keen to make the pyjama trousers this weekend.  I assembled the pattern on Friday night and cut out my fabric - then actually sewed the trousers on Saturday.

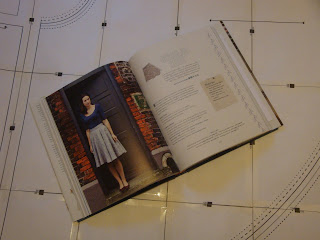
Although it was a Simplicity pattern, assembling it from the printed sheets was far from simple - it was a bit of a mess unfortunately! I got there in the end though - with a few unscheduled folds in the paper! After that though, the instructions were really clear and easy to follow - it was an excellent project, and a great first way to start with trousers! 

Relaxing in my comfy pjyamas
A few new skills for me again with this project:

1. Reinforced buttonholes

Obviously I've made buttonholes before - my first ones were for the circle skirt - but the instructions of my pattern suggested reinforcing the buttonholes of these pyjamas, and I really liked this idea.  It helps to stop the buttonholes going out of shape.  Basically, you just iron on some interfacing on the area you want the hole, and then proceed as normal!

Reinforced buttonholes

2. Putting trousers together

Definitely a whole new challenge for me.  Although there was a bit of working out insides / outsides, the fact that the pattern had notches, which were different on the front and back seams, this meant that it was so easy to line up which seams should go together.  A pleasant surprise when it turns out to be easier than it looks, rather than more difficult!!


3. Drawstring waistband

Drawstring waistband
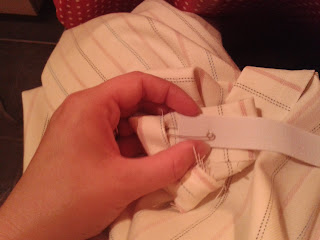
The waistband of these pyjamas are elasticated and also have a drawstring.  There was a little gap left in the sewing of the waistband, and I fed the elastic through - then sewed it up, and fed the drawstring through the buttonholes.  A  handy tip for feeding these things through is to attach a big safety pin to the end - it's much easier to ease the elastic or drawstring through, rather than trying to feel the end of a slim piece of material.

Feeding elastic through the waistband

Wednesday, 19 June 2013

Fabric shopping in Bedminster

It's been a slow week for sewing - I've had quite a lot on in the evenings, which has distracted me a bit unfortunately!  I went out in the sun at lunchtime today though and went to Calico for a bit of fabric browsing.  Well...it was meant to just be a browse, but of course once I was in there I just couldn't resist...!

My next project is going to be PJ bottoms, and I'm going to make them from the new fabric I got today!  It's a beautiful soft cotton stripe - perfect for comfy PJs for curling up in.


However...I am in a bit of a quandry at the moment - I was going to use the pattern from the Great British Sewing Bee book, but I've read a few things online that imply that the pattern sizing isn't quite right.  I've been on the Simplicity website, and found this project for pyjama pants instead, so I think I might give it a go!  Has anyone tried either of these patterns - any recommendations?

The other fabric which I got recently is this gorgeous denim star print - I got it in the Nelaro Fabrics sale on Facebook!  Unfortunately it was the very end of the line, and so I could only get half a metre - so that obviously very much limits what I can make with it!  It might be another bag - we'll see.  Any other ideas welcome...!

Denim stars
No plans for the weekend as yet (apart from packing for my trip to London) so hopefully I'll get some sewing fitted in, and maybe even take my new PJs away with me!

Sunday, 16 June 2013

Flowers and hearts - brooches for summer

Pinterest has given me lots of inspiration when it comes to sewing!  There seems to be pictures of just about anything you could ever want (and a lot of things you probably don't want!) on it.  I love just typing in something and seeing what appears.  One of the things I was wanting to make were fabric flowers, and I found a lovely picture on Pinterest which gave me the inspiration for the cute little flower below.

Pink fabric flower
This one went to Northern Ireland to my sister Deborah, but I'm hoping to make more - they'd be perfect for brooches and to put onto berets as well.

Another inspiration for brooches has been the amazing Cranberry Lime.  I've got a few of her brooches, and really loved them.  I decided to give a similar style of brooch a try, and used the lovely fabric which I used for my bunting to make a few heart brooches.  I thought these were great little accessories for the spring/summer - not too fussy, but just a sweet little extra to an outfit.


I went onto ebay, and found brooch backs for a bargain price - so now I've got 50!  Plenty more brooches to come, obviously!

Wednesday, 12 June 2013

Sewing and a cuppa in Clifton

On Saturday, Liz and I went to Cordial & Grace in Clifton for a cuppa and some sewing.  It is such a lovely cafe - amazing brownies, which was a bit of a naughty breakfast, but sure, it was the weekend...!

Liz doing some pre-sewing prep in Cordial and Grace
We discovered this cafe way back in February when all the Belfast crowd were over - it was the only place which had enough room to fit us all in - although we did make them move all the sewing machines out of the way to accommodate us!  Since then, Pete and I have been back various times, and it seemed like the perfect place for a little sewing fix on a Saturday morning.

They rent out sewing machines by the hour - £5 for an hour, plus a free cuppa.  As well as that, there's various classes, workshops, and even a free knit-and-stitch each month.  We're tempted by a few of the workshops, so watch this space...!

Sunday, 9 June 2013

Pink roses circle skirt

Getting its first outing in the sun is my pink roses circle skirt!  I finished it off yesterday - hemming it up was the final thing that needed to be done.

Sitting in the sunshine in my pink roses circle skirt
A few people have asked me if it's a Cath Kidson skirt, so that's been rather nice!  It's a bit more high waisted than I would normally wear, but it's really nice to try a different style, especially with something I've made myself.

It really is a circle!


I really love it - and now I've got the zip / buttonhole skills I'll definitely be making another one!

Friday, 7 June 2013

My latest project...

I mentioned in a few posts ago that my latest project was the circle skirt from the Great British Sewing Bee book, so I thought I'd update you on my progress.  I'm very, very nearly there...so I thought I would let you know how I'm getting along.

Circle skirt from the Great British Sewing Bee book
As with my previous pattern project, the summer top, I used the downloadable pattern from the Sewing Bee book.  The instructions were all in the book, so once I had prepared my pattern, I was ready to work directly from the instructions in the book.  This was a level 2 difficulty rating, of a maximum of 5, but there was certainly plenty to challenge me.  I think I'm probably a bit mad in my sewing - I tend to just think to myself 'yes, I'm sure I can do that!' and launch into making things without thinking too hard about it.  But I don't think that's too bad a thing - otherwise, I'd probably be too scared to try anything new!

There's not too many steps to this project, but they certainly give plenty of opportunities to learn new skills for a beginner...and for me, lots of chances to play with the stitch ripper!!  There were two main new challenges for me...

  • Inserting the zipper

I know I have (sort of!) already done this before, but this time, I really needed the zip to be properly concealed.  In the bag, it didn't really matter, but obviously in a skirt, if the zip isn't concealed, it can be quite glaring.


Some of the instructions mentioned that to insert a concealed zip, you needed a special invisible zipper foot.  Obviously, that's not something I have, and it looked a bit expensive, so I got the normal zipper foot out of the case for the very first time, and started googling!  Embarrassingly, I actually had to find a tutorial on how to put the foot on, let alone how to use it!  However, once I had managed to attach the foot, the instructions that I found on various helpful blogs were actually super simple and easy to follow. If you want to know how to put in a invisible zipper with a normal zipper foot, I recommend these quick tutorials on Sew Serendipity and BurdaStyle.


However, during insertion, there was a bit of a catastrophe, as you can see below.  I was getting close to the end of the zip, which is a bit more difficult due to the fastener, and I managed to get another bit of fabric gathered up in the sewing.  Not a good look.  Once that happened, it all went to bits (not literally, fortunately!), and really getting it sewn on in the end was almost a miracle, because I had to rip and redo so many times.


I got there in the end though, and here we are - a concealed zip!


  • Buttonholes
When I first looked at pattern I didn't actually notice that I was going to have to learn how to make a buttonhole - oops!  However, out came the handy sewing machine guide, and I discovered that I actually have a buttonhole function on my machine!


The key thing with making buttonholes is to ensure that they are the right size for your buttons!  They need to be fractionally bigger than the buttons, to ensure that you'll be able to squeeze them through.  I used tailors chalk to mark them out before attaching the buttonhole foot and sewing them in.  This is so important to ensure that they're even and that the buttons will fit properly.  Then it's just a matter of using the stitch ripper to make the holes for the buttons to fit through.


Buttons attached, and now all I need to do is finish off the hem.  A job for the weekend, I think...!


Monday, 3 June 2013

Summer shopper bag

A lot of the blogs I've read on sewing recommend that once you've made something once, and got your head round the pattern, sizing etc, you should make it again.  And this time - better :)

In my first blog post I posted a picture of my shopper bag, which was the first project that I made from my Crafty Minx book.  I decided to have another go at it, now I had my head round those french seams and 'right side/wrong side' terminology!  It was my sister's birthday in May, so I thought she would like a new improved version of the bag - and she did!

Summer shopper bag
I had some fabric left over from my summer top, so I used it for the body of the bag.  Unfortunately, I didn't have quite enough length left for the straps, so I decided to do them in a block pink colour, which I really liked - a nice contrast to the 'busy' fabric.  I did french seams, to give it a bit more strength, and sewed on the straps with the cute little box design in the picture in the book.  The big pink button from my button jar finished it off perfectly.
Final threads and...
...finishing touches

As Esther was over in England this weekend, I managed to get this little shot of her posing with it in the sunshine.
Esther with her summer shopper bag