Tuesday, 24 December 2013

Christmas wishes

Merry Christmas!

I just thought I'd check in with a few festive 'selfies' - nothing like a Christmas jumper to get you in the festive spirit.  I've had a few ideas for handmade Christmas jumpers, but just didn't have time this year - maybe next year I'll be a bit more organised!  In the meantime, this one has received lots of compliments.


And here we are looking a little bit more tidy - all dressed up for my work Christmas do!


Lest you think I've abandoned crafting for the moment, I can assure you that's not the case - my recent crafting has been for Christmas presents though, which has meant that I've not been able to put much detail up here.  Hopefully after Christmas I'll get some pictures of handmade Christmas presents on here.

However, I did make this little hat the other weekend - it was actually intended to be a beanie for a Christmas present, but it was chunky wool and I used the wrong size of crochet hook.  It made up quite quickly, but instead of being soft, it actually was quite firm!  I popped it in my head, footered about with the brim, and suddenly realised I had created a cute little hat!


The photos are quite deceptive - it's actually brown, but it's quite an endearing little hat, and really cosy.  If only all crafting disasters turned out so well...!


Saturday, 14 December 2013

Bright stripes cord skirt - pictures

I promised pictures for my cord skirt, and here they are!  Thanks to my sister Esther who took these on our shopping trip to Bath the other weekend - giving my long-suffering husband a break.

 I think it's just the thing to brighten up the winter days!

Tuesday, 10 December 2013

Christmas crafts

We had a quiet night in on Saturday night, after a busy weekend visiting two Christmas markets (Cheddar and Bristol) and having Pete's brother, sister-in-law and lovely niece staying with us.  As well as watching Christmas music and generally feeling festive, I decided to do a few little Christmas crafts.  Here's all my goodies laid out on the kitchen table...


After the Christmas craft night, my latest purchase has been a glue gun.  A major time saver for things like brooches, I really think it's been such a worthwhile investment!

I now have a little gang of snowmen - using the cheapest rice in ASDA (40p a bag), some cheap sports socks, and my hand new glue gun, I created these little bods...


Snowmen

Somehow this rather exciting snow effect got added to this picture, so here's a very authentic looking snowman in the snow!


I also recently learnt how to make little roses out of felt, and this was such a simple little brooch to make. Two pieces of felt, a length of thread, a glue gun and a brooch back, and here we are with a cute little rosebud brooch. I think this will be a lovely little stocking filler Christmas present.


I'll post a little tutorial on how to make these brooches soon - they're so simple and effective.  Watch this space...!

Sunday, 1 December 2013

Christmas Crafts with Crafty Parties

Welcome to December!  Christmas is coming...!

On Friday evening I went to a fantastic craft party, run by the lovely Juliette of Crafty Parties. Juliette is a great teacher and makes 'making' so much fun.  It was this time last year that I went to her Christmas craft party and got my first taste of crafting! As well as running parties and classes for kids and adults, she also makes beautiful brooches, bags, and just about everything else.


Juliette talked us through making gorgeous Christmas lanterns, tree decorations, brooches, and even Christmas snowmen. As you can see, the table was laden with crafting goodies - and once Juliette had finished we dived right in! She was always on hand to help with any questions - and just giving lovely little ideas too.


So this is my adorable little snowman!  He (or maybe she) is made of 2 socks, and filled with rice. So simple, and yet so effective.  I have a feeling there is going to be an entire snow family in our house to help us celebrate Christmas...!


If you're looking for a someone to run a craft party for you - or your children - Juliette is definitely someone you should call!

Monday, 25 November 2013

Roman blind for the landing

The blind for our landing is all done.  It's so nice to have something up in the window again - it really helps finish the room off!  And of course it's lovely to have something in the house that I've made.


I love the pattern - it really brightens up my day to see those big happy flowers!


And after such a success with my first roman blind - it's time to make the second one now...!


Wednesday, 20 November 2013

Bright stripes cord skirt

I look the opportunity last weekend to finish off my New Look 6030 skirt. All I really had to do was finish the yoke and install the zip - both techniques which I've become a bit more familiar with recently! One thing which I do like is the way the patterns recommend finishing the yoke - by stitching through the existing seam, so that there is no top stitching visible when you are sewing the yoke facing to the front. I then finished the back with a zig zag stitch, just to neaten it up.


This has probably been my best (and most pain free) zip installation yet - I managed to not sew random bits of skirt into the zip, and the little flap to cover the zip looked good too. I'm happy that I'm finally getting the hang of this one...!


As the skirt is quite neat fitting, I've decided that I need to reinforce the all the seams with some top stitching, as I did on the front seam. I probably should have done that right at the start, but the pattern didn't suggest it.

I wore the skirt out that evening, and no-one pointed and laughed - always a positive sign! It's been hard to get decent photos - when I leave the house in the morning it's dark, and when I come home again at night it's dark again - horrible! I'll hopefully persuade the hubby to take some for me at the weekend when I finally emerge to get to glimpse a bit of sunshine - so those are to follow!

Sewing with a striped pattern - and with cord - has been a completely new challenge. When working with stripes, the yoke is something I'll definitely be thinking about in the future, and whether the curve should be relaxed a bit, or whether I want to cut another piece, and 'hide' the seam under my belt carriers.

One other thing which I didn't think about when preparing my fabric is that cord fabric has a nap to it - check out this helpful post to understand what that means, and this one when thinking about sewing with cord. Basically, all the pattern pieces should be cut out in the same direction. This was not something I considered! However, now that it's all together, I notice that the brown stripe on the front of the skirt looks a little darker on one side than on the other.  If you were to turn the skirt upside down - it's the opposite way round. The skirt also feels softer in different directions - on one side it feels softer if you run your hands up, on the other side it feels softer when you rub your hands down. This is because I cut my pattern pieces out in different directions, and so the nap is wrong.

To be honest, this isn't a massive concern for me - the colour thing isn't particularly noticeable, especially as the stripes are so bright, and neither is the feel. But it's something that I will definitely want to get right next time around when I make it for Esther - so I'll be referring to those links again.

Watch this space for photos...

Friday, 15 November 2013

Work in progress: New Look 6030

I realise that I'm putting up a lot of 'work in progress' posts and it looks like I'm not quite getting to the finished product - the good news is that the blind is up, but I need to do a little bit of final tweaking before we get the official post, and the pretty pictures :).  In the meantime, I've been sewing another skirt - as if I haven't made enough of those!

This one was on my to-do list though.  I've promised my sisters I'll make them skirts, and Esther found this pattern, the New Look 6030, that she really liked.  It took ages for her to find, as it's out of print - but it made it to me in Bristol eventually.  I wanted to make a little skirt with the striped cord I got in America, and considering I haven't made too many items from a pattern I thought I'd have a go at my version first - then I would have a bit more confidence when trying to sew it for someone else.  The other issue is that Esther won't be over until the end of the month so my plan is to measure her up when she's over and then make sure I'm making the skirt the right size!
Anyway, that's my excuse, and I'm sticking to it!

To be honest, I'm glad I tried my one first - and not just because I like sewing for myself.  As usual, measuring myself led me to pick a size that was...generous!  As a result, I put in very broad side seams and trimmed them down to size, to get the skirt to a more reasonable fit.  I also put an extra inch and a half or so on the bottom of the pattern.  I definitely don't have the legs of the model - neither in length or in width, unfortunately - but the pattern pieces leave you with quite a short skirt, so that extra inch or so is very welcome.

Broad side seams
I've tended to be a bit lazy with my seams - basically, because you can't see them I'm inclined to just cut and leave them, but that does mean that when you wash handmade clothes you can end up with quite a few threads hanging off.  As I don't have an overlocker, I just used the zig-zag stitch on my machine, and it finished off my seams really nicely.  It's worth taking that extra few minutes just to get a good finish on the garment.


The pattern for the skirt has pockets, but because of my (garish) fabric, and the stripes, I decided just to forget about them.  I'll be adding pockets for Esther's version.  The stripe has been a bit problematic when preparing the yoke and belt loops though.  As you can see, the pattern pieces for the yoke are curved.  This has meant that the stripe gradually moves from vertical to diagonal as you go round the waist. It also meant that my belt loops are a bit 'off' looking, which is annoying.  A lesson regarding the choice of fabric, I think!


I have hemmed the skirt, and put in the darts in the back piece, so the only bit left to finish is the inside of the yoke and, of course, the zip.  I can't wait to finish it - I think it will definitely brighten up my winter wardrobe!

Thursday, 7 November 2013

Slouchy green beret


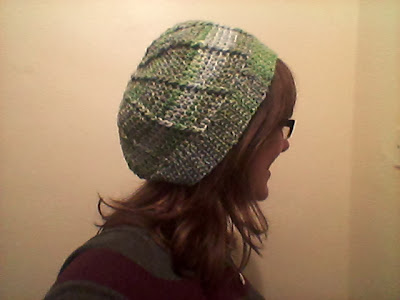
My green beret from the Simply Crochet pattern is finished - I actually finished it off last weekend, but it's taken me a while to take a few pictures - they're certainly not the most professional (taken on my phone, I'm afraid), but you get the idea.

I really like the colours in it, and the spiral pattern adds a bit more interest as well. Perfect for my new obsession with green...!


As with every new project, there were plenty of challenges.  As well as the front post double crochet stitch, which took a while to get my head around, I found the beret came out a little wider than expected.  I think I need to start measuring my gauge - I tend to be one of the people who wants instant gratification with my projects and doesn't want to faff about with measuring etc, but once I start making sweaters (I got a book in America, so that's my ultimate plan!), I know they're going to require a lot more accuracy.  This beret isn't too loose to wear though - and I may get some elastic to thread through the brim, just to tighten it up a little.

I'm looking forward to wearing it out and about now that the winter is coming in!

Tuesday, 5 November 2013

Work in progress: roman blind

As all the work on the house finally nears completion, I'm glad to report there is no more painting to do, so I took the opportunity last night to get started on the roman blind for the landing window.  All the bits for the blind seemed a bit complicated to gather up, so I was really pleased to find these roman blind kits for sale, at a really reasonable price.  I ordered two a week ago, and they arrived the next day by Fedex - brilliant service from Terry's Fabrics!  It meant all I needed to do was buy my fabric, and I was ready for action.


The kit also came with a little instruction leaflet, which gives you step by step instructions on what to sew, and how to put everything together.  I cut out the fabric to the instructions, and then hemmed.  One little issue I did have was that there was only 2cm at either side for hemming - which as it turns out isn't quite enough for me!  My estimate 'by eye' of the length of a centimetre was a little overly generous, but I got there in the end!


I then needed to sew on the roman blind tape - basically, a velcro strip which sticks the blind to the baton at the top.  By this stage the fabric was very thick, as there were quite a few layers, and I was aiming to get as near to the edge as possible.  Apart from a few wobbles, though, I got both edges sewn securely.


A pocket is required at the bottom of the blind, for the heaviest rod to go into, to ensure the blind hangs straight.  The pocket is about 5cm, leaving plenty of space for the rod to slide in.


Finally, I used the pre-cut loop tape provided in the pack, and sewed this evenly along the blind - doing my best to make sure each tape was parallel.  The tapes are used to slide the rods into, so the blind folds up, so it's important to make sure they are parallel.  One error I realised I'd made once the first row of sewing was done is that my tapes are 20cm apart - and as the final piece of blind doesn't have a fold, it will be longer than the other pieces. It's certainly not the biggest issue I could have had though - and I'll know for next time!


I'm hoping to get the blind finished in the next few days, so watch this space for the finished product...!

Thursday, 31 October 2013

Crochet magazines!

When I was at the show a few weeks ago, there was a stand which was offering subscriptions to various craft magazines - three months for £1!  My plan had been to get a subscription for Christmas, but I swiftly abandoned that (£1 isn't really enough for my hubby to spend on my Christmas present!), and signed up for Simply Crochet.  I had already got issue ten, so I'm looking forward to having lots of crochet patterns and the guidance in the magazine to give them a go.


There are 33 patterns in this issue, lots of which I really fancy having a go at.  There's even some crochet jewellery, which looks brilliant!

My first project has been a slouchy beret - as if I haven't already got enough berets!  This one involved more new stitches (and also learning the UK stitches, after initially realising I was learning the US stitches).  My latest new stitch is the front-post double crochet.  It makes a beautiful raised pattern on the surface of the beret, and adds a little bit of interest to it.  I used some gorgeous green double knitting Woodlander wool that I got at the show too.

I'm almost there, but here's a quick preview in the meantime...


Front-post double crochet stitches


Tuesday, 22 October 2013

Flower Power cushion cover workshop

When I was looking at the Knitting and Stitching Show website, I saw there were lots of workshops we could do - between an hour and two hours long, and for a really reasonable price!  We took the opportunity to make the 'Flower Power cushion cover' - for the very reasonable price of £10, it seemed like a bargain opportunity to learn a little more about using our sewing machines and making something pretty for the house!


Using the needle threader

Yes I know - ten months of sewing and I still didn't know how to use my needle threader!  I should be ashamed!  Obviously I could have checked online but I could thread it myself (usually!) so I never quite got round to it.  Wendy, our tutor, was on hand though to show us how.  Surprise surprise, it's very simple, and now it'll save me precious seconds at home when I go to thread my machine!

Appliqué

My previous cushion was my first go at appliqué, so it was great to have another try under some guidance.  I chose dark thread to go over my flowers - just to show off any mistakes, of course - so I had to be extra careful.  The bottom flower was a bit of a fiasco, but fortunately I covered it over with the second one so the overall effect was pretty pleasing!


Envelope back cushion

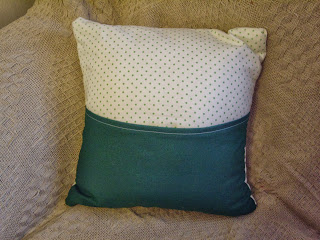
An envelope back was the perfect thing to be doing in the hour long session we had.  Obviously, I started off my cushion making with a zip cushion (for some reason I always pick the hard things first!), but the envelope back is so easy to do and really effective.  Unfortunately I was running out of time in the workshop so under pressure I managed to get the wrong part of my envelope overlapping.  Still, I think it looks lovely and is so much simpler to do than the zip.


Although the hour was pushing things a bit, it was a great chance to have a play with the sewing machine (which was a beautiful Janome - I got sewing machine envy) and it was lovely to have something to take home and show off.  Now that a lot of the work on the house is finished, I'm going to get the spare room cleared and it will look perfect on the bed in there!

Monday, 14 October 2013

The Knitting and Stitching Show


I have been so excited for weeks, looking forward to the Knitting and Stitching Show!  The show was in Alexandra Palace in London, and Naomi, Liz and I made our way to London on the train at silly o'clock in the morning - 7:30am is beyond ridiculous for a Saturday!  We got off the underground at Wood Green with an absolute hoard of other women, and just followed the crowd to the shuttle bus.  Just look at all these people...!

The show was packed with fabric, yarn, patterns, crafts and all sorts - and best of all, people who just love it all as much as we do.  I even got to see the judges of the Great British Sewing Bee!


We also did a few workshops - we made lampshades and cushion covers, which was great fun.  They were each an hour long - which also gave us a bit of training in working under pressure!  Dami came and met us, and she did a 2 hour glove knitting workshop too, which she said was brilliant.

Here's a bit of a flavour of the day...

Naomi at her sewing machine in the cushion cover workshop

Yarn!

Sewing action shot
Lampshade making


Dami, Liz and me
Naomi and my purchases!